
First thing to do when restoring a classic scooter or motorcycle (after checking you have a very full wallet) is to take it apart bit by bit and screw by screw.
Some tips:
- You can not take enough photographs. Once you are faced with a pile of a few thousand parts it will suddenly not seem that simple after all. I thought I took enough, but didn’t.
- Label all your parts, even if you take photographs. You can buy 200 tags with a bit of string for a few pounds and it will really help to know where that screw goes…
- Store parts logically if you can. I use plastic containers to group parts after tagging them with a label. For example, the front brake assembly can go into one plastic container etc.
- A restoration will take a long time. Much longer than you think. You spend most of your time browsing the internet for tips and parts rather than in your garage (at least, that’s what it is like for me). That means that many parts that are normally not (fully) exposed to air will be. Like bolts, axles or engine parts. So order a good supply of Ziploc bags and store your parts in them after spraying with a little WD40. It will really slow rust from forming and, even better, if you don’t see the restoration through, someone might even buy it off you if it’s not all rusted.
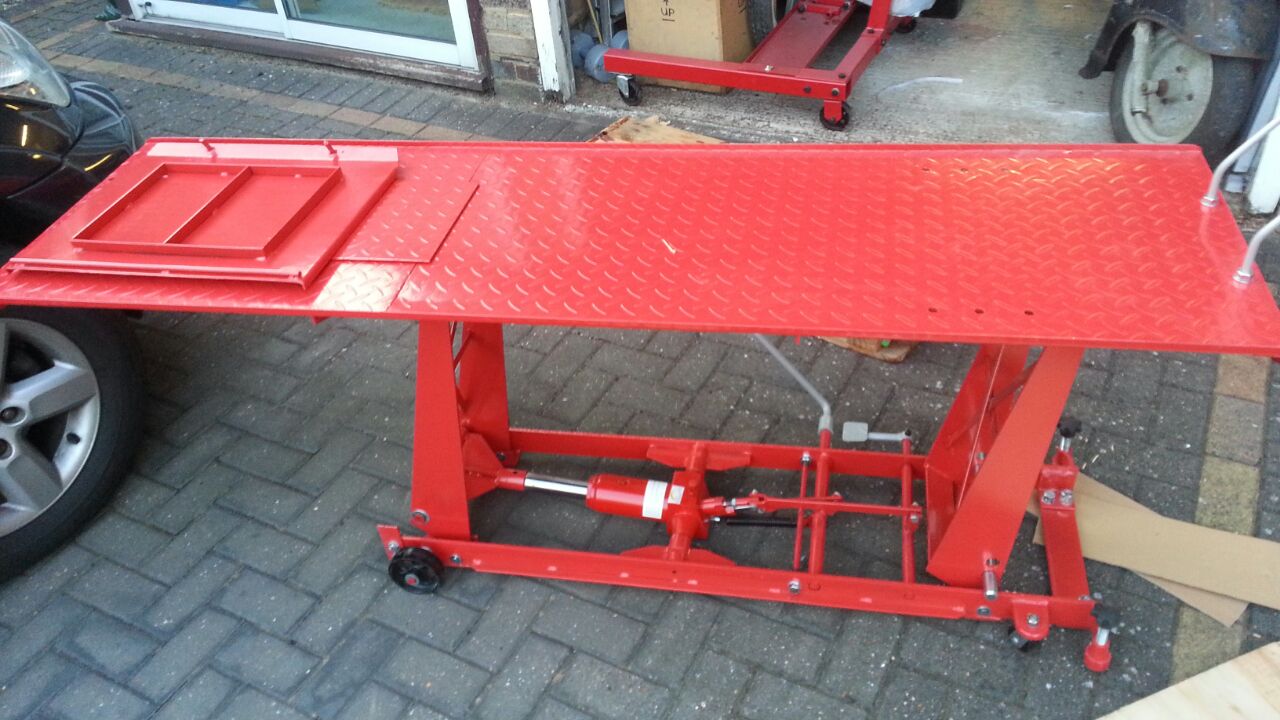
- A hydraulic motorcycle lift is really really useful. I bought one for 250 GBP new (H1 2014) and it has saved me no end of back-ache restoring; your knees will thank you too.
When I bought it my Bella looked like this:
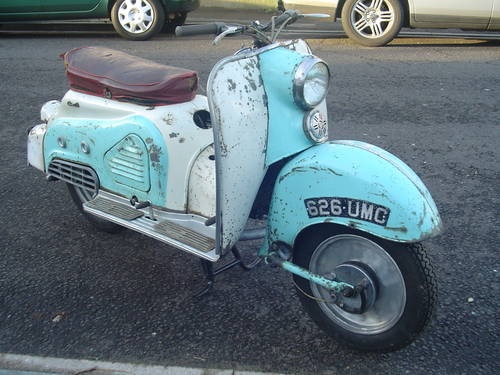
Not too bad a state on the face of it, but looks can be deceiving. The leg shield was beyond repair, bodywork needed a lot of work, the foot boards were rusted through, the reflector of the lamp held aluminum foil to reflect, etc.
So the first order of business is to strip the scooter. Photographs of the stripping process follow in the links below. I have not included all photos here, some are included in the restoration section where detail is more important. A tip: carefully photograph the support bolts that hold the foot boards and metal bushings; I spent too much time reverse engineering how the ten odd bushings should fit.
We’ll start with the exterior of the scooter. Bella scooters come in many models and slight differences were made throughout its production run. It helps to have good photographs when sourcing new parts as suppliers tend to know what your particular part number is when looking at them.
Next we’ll photograph what can be seen from the side inspection hatches (note the location of the ignition coil). An interesting bit here is the fuel tap. Not that your ignition key is used to turn the fuel flow on. You can insert your key through a rubber on the side of the rear cover and a small extension rod transfer the movement of your key to the fuel tap. Be sure to remove the rod before removing cover to prevent damage. These fuel taps were only made for the Bella as far as I’m aware so are hard to replace. It’s also a bit of a ‘security feature’ in that the fuel tap is hard to open without tools. At the same time it is annoying to have to stop, switch the scooter off, take your key, put the fuel tank on reserve, start the scooter again etc. For me the aesthetics win.
We then move on to the steering and controls and the battery cover. The battery covers are hard to replace, but the UK Zündapp Bella Enthusiasts Club can source a non-metal replacement for you.
After that it is time to take the body off and take a few photos under the cover. This and later on is where you want to ensure you take more pictures than I did of the horizontal support bolts and how they hold things up. They are about a foot long and support various parts. Underneath they look like this.
Now the foot boards are off, it is time to take a large number of pictures, especially of which bushings are where and in what order, there are quite a few, so more pictures is better. The support bolts are not equally as long, please note which you take from where. Another small tip: do not have them powder coated as they won’t fit through the frame support bracket holes. They are covered with bushings anyway, so just grease them up when installing to prevent rust.
Next is the fuel tank. It’s a slightly non-standard setup where the tank is strapped down on top of some rubber bushings (or should be).
After taking the fuel tank off, we can take a good look at some of the engine surroundings and the air filter which can be removed.
Before removing the engine we take a look at the drive chain and the rear suspension setup. Note that the springs are simply screwed onto protrusions on the frame and swing arm. Very simple, but very effective.
Almost done; time to remove the front fork. When that’s done, all that is left is the frame. You can remove the swing arm by loosening the bushing clamp. Be careful not to damage the swing arm bushing; they are hard to replace. At the same time they can be very rusted. I removed mine by screwing a slide hammer into them and (very) patiently hammering away while frequently applying WD40.
A few other removal tips:
- Take photographs of the wiring in detail if you can
- Be very careful when removing the leg shield; it does come off without bending the sheet metal!
- Be very careful not to damage the rear light lens cap if it is still good. They are very expensive to replace (www.claussstudios.com)